Social Icons

Photobucket

About

Featured Posts

Tuesday, February 5, 2013

Dell Inspiron N5040 Optical DriveRemoval

1. Before removing the Optical Drive:
  • Ensure that the work surface is level and protected to prevent either the surface or the computer from being scratched.
  • Make sure the system is powered off by either shutting down the system through the operating system or by manually holding the power button.
  • Ensure that all attached devices are powered off.
  • Disconnect all external cables from the computer.
  • Remove the Battery  from the system.
  • Remove the Keyboard  from the system.
 2. Remove the one screw securing the optical drive.


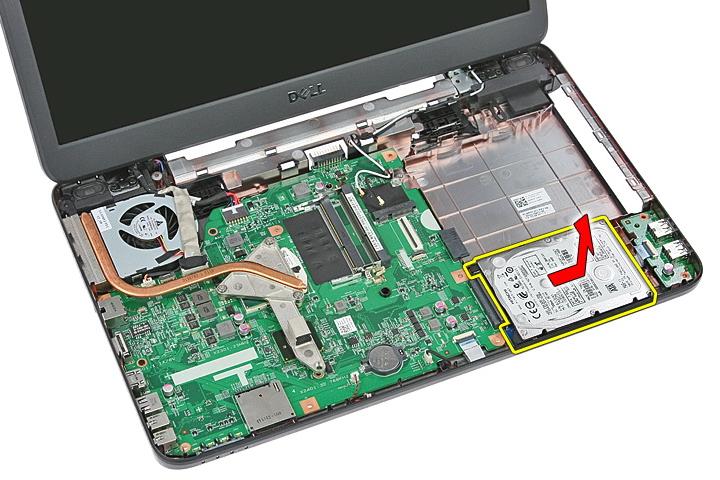
3. Insert a screwdriver into the slot and carefully nudge the optical drive out of the system.


4. Complete.


Dell Inspiron N5040 Keyboard Removal

1. Before removing the Keyboard:
  • Ensure that the work surface is level and protected to prevent either the surface or the computer from being scratched.
  • Make sure the system is powered off by either shutting down the system through the operating system or by manually holding the power button.
  • Ensure that all attached devices are powered off.
  • Disconnect all external cables from the computer.
  • Remove the Battery  from the system. 

2. Release the four latches securing the keyboard to the system.


3. Slide the keyboard up and turn it over.


4. Open the keyboard cable securing clip.


5. Disconnect the keyboard cable. (Note: While reconnecting the keyboard cable, ensure the side with the white stripes is facing upwards)


6. Complete.


Dell Inspiron N5040 Palmrest Removal

1. Before removing the Palm Rest:
  • Ensure that the work surface is level and protected to prevent either the surface or the computer from being scratched.
  • Make sure the system is powered off by either shutting down the system through the operating system or by manually holding the power button.
  • Ensure that all attached devices are powered off.
  • Disconnect all external cables from the computer.
  • Remove the Battery  from the system.
  • Remove the Keyboard  from the system.
  • Remove the Optical Drive  from the system.
2. Turn the system over and remove the eleven screws securing the palm rest.


3. Lift up to open the power button board cable securing clip.


4. Disconnect the power button board cable.


5. Lift up to open the touch pad data cable securing clip.


6. Disconnect the touch pad data cable.


7. Remove the two screws securing the palm rest to the system.


8. Gently pry along the edges of the palm rest.


9. Lift up the palm rest from the system and remove.


10. Complete.


Sunday, December 9, 2012

Dell Inspiron N5040 Internal Speakers Removal

1. Before removing the Internal Speakers:
  • Ensure that the work surface is level and protected to prevent either the surface or the computer from being scratched.
  • Make sure the system is powered off by either shutting down the system through the operating system or by manually holding the power button.
  • Ensure that all attached devices are powered off.
  • Disconnect all external cables from the computer.
  • Remove the Battery  from the system.
  • Remove the Keyboard  from the system.
  • Remove the Optical Drive  from the system.
  • Remove the WLAN/Bluetooth  from the system.
  • Remove the Palm Rest  from the system.
2. Release the speaker cables from the routing channel.


3. Release the left speaker from its securing latches.


4. Lift up the left speaker and remove.


5. Release the right speaker from its securing latches.


6. Lift up the right speaker and remove.


7. Complete.


Dell Inspiron N5040 Hard Drive Removal


Before removing the Hard Drive:
  • Ensure that the work surface is level and protected to prevent either the surface or the computer from being scratched.
  • Make sure the system is powered off by either shutting down the system through the operating system or by manually holding the power button.
  • Ensure that all attached devices are powered off.
  • Disconnect all external cables from the computer.
  • Remove the Battery  from the system.
  • Remove the Keyboard  from the system.
  • Remove the Optical Drive  from the system.
  • Remove the Palm Rest  from the system.
2. Remove the two screws securing the hard drive.


3. Slide the hard drive out from its connector; then lift it out and remove.


4. Complete.


.

Dell Inspiron N5040 Microphone Removal

1. Before removing the Microphone:
  • Ensure that the work surface is level and protected to prevent either the surface or the computer from being scratched.
  • Make sure the system is powered off by either shutting down the system through the operating system or by manually holding the power button.
  • Ensure that all attached devices are powered off.
  • Disconnect all external cables from the computer.
  • Remove the Battery  from the system.
  • Remove the Keyboard  from the system.
  • Remove the Optical Drive  from the system.
  • Remove the Palm Rest  from the system. 
2. Disconnect the microphone cable.

3. Gently slide out the microphone and remove.

4. Complete.

Dell Inspiron N5040 USB Daughter Board Removal

1. Before removing the USB Daughter Board:
  • Ensure that the work surface is level and protected to prevent either the surface or the computer from being scratched.
  • Make sure the system is powered off by either shutting down the system through the operating system or by manually holding the power button.
  • Ensure that all attached devices are powered off.
  • Disconnect all external cables from the computer.
  • Remove the Battery  from the system.
  • Remove the Keyboard  from the system.
  • Remove the Optical Drive  from the system.
  • Remove the Palm Rest  from the system.
  • Remove the System Board  from the system.
2. Peel the USB board cable from the adhesive affixing it to the chassis.


3. Gently pry the latches to release the USB board.


4.  Lift up the USB board and remove.


 5.Complete